Monday 29 December 2008

Give us today our daily bread

I loooove the smell of freshly baked bread! Home-baked bread disappears faster than one can spell b-r...Continuing all the wonderful times of my baking classes, decided to make a cannelloni (which by the way my help at home has learnt to perrfection!) with garlic and cheese bread was made for dinner.


The yeast is still at home in abundance, so much so that naans (also perfected by my help!) are now becoming part of daily fare!

To add a bit on break-making, important to follow. The process of letting the dough rise is known as proving. During the whole proving of the dough the yeast are multiplying, feeding on the sugar that is present. Carbon dioxide is produced, and this fills up the tiny gas pockets generated during the kneading of the dough

Once the dough has doubled in size it is important to knock the dough, this is similar to kneading. The dough is punched after which it is kneaded gently for a short time. The aim is to remove any air pockets which have might formed in the dough, create an even texture in the bread and redistribute the yeast, allowing fermentation to continue. The dough can then be proved a second time.

Here's the recipe!

Ingredients:
Flour - 250 gms
Yeast - 15 gms (1 tbsp - fresh yeast)
Warm milk - 50 ml
Sugar - 10 gms (2 tsp)
Butter - 15 gms
Salt - 5 gms
Water - as required
Cheese - 75 gms (8-0)
Garlic - 10 flakes

Method:

  1. Disperse yeast along with sugar in a little warm milk and keep aside for 2-3 mins

  2. Sieve flour into a marble top (preferably) and make a well in the centre

  3. Pour yeast mixture , add water as required to make a soft dough (do not knead)

  4. Mix butter and salt and ix it into the the a smooth dough

  5. Cover the dough with a wet cloth (e.g. muslin) and leave till it rises to almost double in size ('proving')

  6. Take the dough and knead it on the marlble top again - add in chopped garlic and half the cheese

  7. Shape into loaf and place on well greased baking tray and prove again till it doubles in size

  8. Once done brush with egg wash (I use a milk walk which is 50 ml with 1 tsbp of sugar)

  9. Sprinkle with remaining cheese and bake in oven at 200 degrees celcius

  10. When done sprinkle with melted butter!

The cheese and garlic can be replaced with almost any filling you wish, mushrooms, olives, herbs, paneer etc.


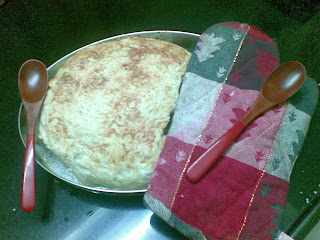
All ready to be served for dinner!

Tuesday 23 December 2008

Flat, baked, square or ...

..sliced from a type of dense, rich chocolate cake.Brownies come in a variety of forms. They are either fudgy or cakey, depending on their density, and they may include nuts, frosting, cream cheese, chocolate chips, or other ingredients. A variation that is made with brown sugar and no chocolate is called a blondie.

Thats the Wikipedia definition for a brownie.


Been on a brownie marathon baking marathon today, so much so that I have yet to start my packing, when its 10:41 PM and there's a flight at 8 AM tomorrow to saddi dilli! (Blogging a bit later would be a good idea, right now!)

With X'mas celebrated by the family (in-laws), there's always an exchange of gifts, and you guessed it, this year I intend giving all brownies.

Took the day off today to bake!! Haha!! With ingredients such as nougat & chocolate chips not available at regular stores, a trip to Arife La Moulde (opp. Shoppers stop, Bandra (W)) was mandatory. A visit to such shops is always leaves me confused; I end up buying a lot of junk as well. Like the last time I ended up with coloured decorative sprinkles, and this time it was ginger bread man (& woman) cookie cutters.

Fudgy chocolate chip brownies (makes about 16)

Ingredients:

Buttter - 100 gms
Chocolate - 100 gms
Eggs - 3
Castor sugar - 300 gms
Flour - 150 gms
Chocolate chips - 75 gms

Method:
- Preheat oven to 180° celcius
- Grease and line a 9” square tin
- Melt butter and chocolate together, personally I prefer using the microwave over the double boiler, but remember turn down the power of the microwave to about 60% if the wattage is over 1000.
- Whisk eggs and castor sugar
- Add chocolate mixture
- Add in flour and chocolate chips
- Pour into tin and bake for 35-40 minutes

Ideally, one is supposed to bake brownies only 90%, eggophobic me refuses to comply with any such instruction (it’s a miracle I manage to bake anything with 3 eggs – but omelets I love!)

Blonde brownies (makes about 32)

Ingredients:

Flour – 500 gms
Baking powder – 2 ½ tsp
Butter – 150 gms
Brown sugar – 500 gms
Eggs – 3
Chocolate chips – 125 gms
Walnuts – 200 gms
Nougat chips – 50 gms


Method:
- Preheat oven to 180° celcius
- Grease and line a square tin
- Mix the chips and walnuts
- Sift baking powder, flour and add ¾ the above mixture
- Cream butter with brown sugar, add in eggs
- Add in the flour mixture, at this point you might need to mix it all with your hands as it forms a dense dough like texture
- Press into the tin and bake for 25-30 minutes

Have a look - I’ve yet to pack the them; well first I start with mine own then pack the brownies!

Merry Xmas!


Monday 22 December 2008

What next

Lazy, lazy, lazy, SO lazy - here's a gist of all that I've been busy baking and making, posts of which will follow soon..
  • Garlic and cheese bread
  • Baked cheese cake
  • Sticky toffee and date pudding

Here's a lovely pic of Worli (near Haji Ali) from our car, we were headed to Swati in Mahalaxmi for snacks. We were stuck at this exact same spot for about 45 mins!


Wednesday 10 December 2008

The King of Tortes

I've been admiring Passionate about baking's Chocolate walnut torte ever since it was posted in early November. Yummee only!

Finally made it yesterday, the results in my opinion were fairly disastrous. To start with, the walnuts refused to get ground finely. I was worried they'd get oily and bitter (like almonds) if I over did them in the food processor. Next, I had to turn to my husband's expertise (he excels in meringue making and baking in general) for the egg beating - the whites refused to form peaks even after 15 mins. My patience gave way after those 15 mins and I found myself mixing (instead of folding) all the ingredients and baking them.


The end result was quite a surprise, it was definitely not a good looking torte, but very tasty, especially when chilled.

Ingredients:

Butter - 2 tbsps, chilled
Walnuts - 1 1/2 cups
Eggs - 4
Granulated sugar - 1/4 cup
Vanilla essence - 1 1/2 tsp
Powdered sugar - 1/4 cup
Dark chocolate - 100 grams, melted and cooled
Instant coffee powder - 3 tsps
Hot water - 2 tbsps

Method:

  1. Preheat oven to 180 C.
  2. One is supposed to use a spring form pan, I don't own one, so just used a regular 9 inch circular pan lined with butter paper.
  3. Run walnuts in the food processor with 1 tbsp of sugar till ground. Drop in 2 tbsps of chilled butter & pulse till it all comes together (this did not happen :-( when I made it)
  4. Press nuts evenly onto bottom and sides of the pan.
  5. Separate the egg, putting the whites into a large bowl - ensure not a single drop of yellow gets into the white.
  6. Beat the yolks with an electric mixer on high speed about 5 minutes or until thick and and the colour lightens to a lemony yellow
  7. Gradually beat in 1/4 cup of the granulated sugar & the essence.
  8. Beat in melted chocolate with a spatula.
  9. Dissolve instant coffee powder in hot water, stir into chocolate mixture.
  10. Wash and dry beaters of mixer (very important - I was in too much of a hurry, which might have been the reason for the flat egg whites.
  11. In a large bowl, beat egg whites until soft peaks form.
  12. Gradually add the remaining 1/4 cup of powdered sugar, beat until stiff peaks form. (Tip from the husband: sugar helps in the formation of stiff peaks, hence proportion is very important) .
  13. Pour chocolate mixture over the egg whites; gently fold in (I mixed away in agony).
  14. Spread evenly in spring form pan.
    Bake for 20-25 minutes of until set.
  15. Cool in pan on wire rack for 15 minutes.

To serve, sift powdered sugar over the torte - I made a star shaped pattern on the cake oops torte.


My share of the yummy torte.

Monday 8 December 2008

Bagel Shop - Part II

I've been itching to make bagels ever since a visit to the Bagel shop. Multiple attempts to make bread with the dry yeast one gets in shops were met with complete failure. Until I attended these baking classes ,where not only did I find lots of confidence, but a whole lot of fresh yeast, to be precise half a kilo! So there's been whole wheat bread, garlic and cheese bread, bread rolls etc. etc. And then I thought, why not bagels!

Anyways, without getting into the intricacies of the ingredients (which I'll probably describe in another blog) the process of making the bagel was a whole lot of fun. Like described earlier, bagels are cooked in boiling water before baking. I read up a whole lot of recipes, taking bits from here and there. Some recipes spoke about using caramelised water for boiling the bagels - I thought it better to cut out the sugar and added a a bit of baking powder instead in attempt to make the bagels fluffy. Some others mentioned proving the dough overnight, which is what I did - it made the bagels chewier.

The end result


Chomp! Chomp! Chomp! The bagels were just yummy.


This what they looked like, fresh from the oven, had one for breakfast.

On a chocolatey note, went for a chocolate making class this weekend!! The class was just lovely, found it hard to believe some of the stuff, just look! We even got our own individual decorative bags, which we filled with the chocolate we made to take back home!


Saturday 6 December 2008

Broken hearted

Pineapple season is supposedly from July to September. In Mumbai however I've seen it available almost through out the year. We've suddenly rediscovered it yumminess and have been buying it almost everyday. I love the way the fruit vendors deftly peel and chop fruit, resulting in packet full of starry discs. Did you know pineapple is a good source of vitamin A and B and fairly rich in vitamin C and minerals like calcium, magnesium, potassium and iron?

Of late there's been a lot of chocolate baking at home, be it cookies, brownies, cupcakes - ALL chocolate! We love chocolate, but at the same time change was most welcome.

Another of Nigella Lawson's recipes. The only ingredient I omitted was candied cherries. Add if you have access to them, will definitely add colour to the cake.

Pineapple upside down cake

Ingredients
2 tablespoons sugar
6 slices pineapple (fresh or from the can - I used fresh, but ofcourse!)
3 tablespoons pineapple juice (Tropicana)
100g flour
1 teaspoon baking powder
1/4 teaspoon soda bicarbonate
100g soft butter
100g caster sugar
2 eggs
butter for greasing

Method
1. Preheat the oven to 200°C. Butter a tin

2. Sprinkle the 2 tablespoons of sugar on top of the buttered base, and then arrange the pineapple slices to fill up the base
3. Mix flour, baking powder, soda bicarb, butter, caster sugar and eggs
4. Pour in the 3 tablespoons of pineapple juice to thin it a little
5. Pour this mixture carefully over the pineapple; it will only just cover it, so spread it out gently
6. Bake for 30 minutes, then ease a knife around the edge of the tin, place a plate on top and, with move, turn it upside-down

It turned out just lovely, light and fluffy, super moist, with a subtle flavour of the pineapple, with a juicy slice of pineapple to top it off. It looked so so tempting, a piece was cut off even before I could take a picture, and as I write this blog most of it has been eaten by the husband and just the husband alone!